Kamis, 02 Juni 2016

Quick Chicken Fence Repair

We found out the other weekend that wire mesh movable electric fences (one of these guys) and lawnmowers dont get along very well.  While trying to get into a tight spot behind the bee hive, the lawnmower managed to reach out and pull one slightly-less-than-taught section of the fence into the blade.

Heres a question for you: given that it takes the human brain around 0.2 seconds to process a stimulus and react, that the lawnmower blade spins at 200 rpm, and that the fence cost $165, can you calculate how many dollars per blade revolution the lawnmower did?  Ready, go.

Easy, you say?  0.2 seconds equates to 2/3 of a revolution, and the fence was obviously destroyed, bringing the total to $247.50 per revolution?

Wait, theres more information: first, we didnt have the fence electrified and werent planning to since it kept the chickens in just fine without electricity (until we put a big hole in it with the lawnmower), and second, we saved the wire wrapping that our rolls of hardware cloth and woven wire fencing came in, along with plenty of other wire scraps.  Turns out that, as long as we still dont want to electrify it, the cost was more like an hour of Jakes time, or basically, $0.00.

We started by laying the damaged section of fence as flat as possible, figuring out what strands were missing, then replacing the vertical missing vertical strands with pieces of 16 gauge wire.  Where there were a few remnants left, we tried to wrap them around the new wire.  We also fed the new wire through the horizontal strands when they were still intact.

Similar drill for the horizontal wires, except using the thinner wire that the hardware cloth roll was wrapped up in.  Our thinking is that the thinner wire will make it more flexible in the horizontal direction when we eventually roll up the fencing.  In extra-damaged places (like in the first photo), we wrapped the horizontal wire directly around the new vertical pieces.

The finished product doesnt look perfect, but it does keep the chickens out of the garden.  Will it ever be electric again?  Hard to know.  If we decide to try it, well update the post.  In the meantime, mission accomplished!


How do you do electric fence netting repair?


Read More..
The Interfaith Hunger Coalition was present at the End Hunger in New Mexico summit this past Wednesday and Thursday.  Ellen Buelow (Holy Rosary Catholic Community) led a workshop  with the help of Judy Messal (All Saints Lutheran Church) and Kathy Freeze (Catholic Charities of Central New Mexico). The workshop presented the history, goals and mission statement of the IFC as well as some data on hunger in New Mexico (courtesy of our partner New Mexico Voices for Children.

While most of our work has been in Albuquerque, many of the participants in the workshop were from communities elsewhere in New Mexico, including Roswell, Ruidoso, Cloudcroft and the Navajo Nation. In addition to learning about the IHC, participants shared their experiences and challenges working with people who are vulnerable to hunger.  For the members of the Chaves County  J.O.Y. Centers (pictured at left), a main concern was hunger among seniors.

 We also had a display table coordinated by Bert Scott (Central
United Methodist Church). Most of the materials for the display were designed by Jeanne Elmhorst (Albuquerque Mennonite Church).  Many people volunteered to staff the table, including Joy Dinaro (Immaculate Conception Catholic Church) and Ian Wood (Archdiocese of Santa Fe), pictured at left, Carole Everton (Holy Rosary Catholic Community), Kathryn Arndt (Community of Hope) and others . We hope that our presence at the summit allowed more people to know about us, which is an important step in the growth of our coalition.
Read More..

Mercy is that which God likes Most

"Let us abandon all fear and dread, for these do not befit men and women who are loved. Instead, let us live the joy of encounter with the grace that transforms all."   -Pope Francis
The Cloisters Museum, New York
On Dec. 8, Pope Francis launched the Jubilee Year of Mercy, an effort to focus the mission of the church and of the faithful on mercy and forgiveness rather than on judgment. This is a call for both individuals and for the institution.

"This Extraordinary Holy Year is itself a gift of grace," Francis said during the homily at a Mass in which he proclaimed the start of this extraordinary effort. "To enter through the Holy Door means to rediscover the deepness of the mercy of the Father who welcomes all and goes out to meet everyone personally."

"If we were to forget, even just for a moment, that mercy is that which God likes most, every one of our labors would be useless because we would become slaves of our institutions and our structures, however renewed they might be," the pope said the next day at his general audience in St. Peters Square. "We would always be slaves."

The U.S. Conference of Catholic Bishops offers five suggestions on how to answer this call to be merciful. In a post on the USCCBs Go Forth blog, education and outreach director Jill Rauh invites us to Pray for awareness of God in our own lives, to Pray with the Gospel, to Encounter, to Prepare to be Merciful, and to Realize that We are all in this Together.

"These exercises for prayer and reflection are only a start. Preparing our hearts for the Jubilee Year can help us live out Pope Francis’ vision in Evangelii Gaudium of a Church, which, “guided by the Gospel of mercy and by love for mankind, hears the cry for justice” and responds to Jesus’ command by Mark 6:37 (full context, Mark 6: 30-44) by “working to eliminate the structural causes of poverty” (no. 188)," said Ruah. "We start with prayer, then reach out to encounter others. Then we learn and discern together about how we might be called to act. The Jubilee Year of Mercy is the perfect opportunity to engage this process." Read full  blog post
Read More..

Freezing Dandelions

As we were out in the yard this weekend, seeking some kind of gardening activity that didnt require digging in the still-too-wet-for-planting dirt, we decided it was time to weed under the chicken tractor row cover that was protecting our overwintered swiss chard and garlic.  The row cover is slightly wider than the garden bed, which meant that immediately inside the walls was a tall, lush layer of grass and dandelions.

Some of the dandelion flower stalks were a full two feet long, and the leaves were approaching a size that would make romaine lettuce jealous.  Those huge dandelion leaves, which grew much faster than their counterparts outside of the mini greenhouse, were naturally less bitter because the plant focuses more on biomass production than defense systems (in our minds, anyway).  Which is all another way of saying that, even though they were more than wed need for this weeks meals, theyd be a real shame to waste!  Why dont we try freezing some to save for later?

A quick search of the internets reveals that, of course, were not the first folks to formulate such a plan.  It turns out that blanching the greens just like spinach, chard, collards, or other things normal people eat, works just as well with dandy greens (although maybe we dont even need to blanch them before freezing).  Heres a brief rundown of our new protocol for preserving one of the most exciting parts of spring.

We rinsed all the dirt (of which there wasnt much) and dandelion seeds (of which there were a lot) off the greens, then coarsely chopped them and set them soaking in a bowl of water.  (Even though the plants had already gone to seed, chopping and soaking the leaves takes the bitterness down to an acceptable level.)  We usually soak twice with a change of water in between, and usually for half an hour per soak, although the second soak went overnight on this particular batch.

Then we drained off the water and transferred the greens into one of these-type pots, with a big pasta insert.  The outer pot has a couple inches of boiling water in it, and we steam blanched the dandy greens in two batches of about a half pound each, for three minutes each.

Steam away, little dandies! (We took off the cover to take the picture.)

Then we quenched in cold water for a minute or two...

...and transferred the chilled greens to a salad spinner to get most of the residual water out.  Just sitting in the strainer basket does a pretty good job, but actually spinning them really gets er done.

We put them in freezer baggies, and now theyre ready to hibernate!  Whats the easiest way to get the residual air out of the bags?  We seal them most of the way across, push most of the air out by hand, then press the unsealed inch or so to our lips and suck the rest out like reverse CPR.  While still applying suction, we seal the bag the rest of the way across.  Dont tell the NCHFP! 

Even though we froze the whole batch, we still wanted some for this week.  So almost as soon as they were frozen, we took one bag out and made a quiche, which also incorporated some overwintered green onions, dried tomatoes from last summer, and some frozen sorrel from last weekend. 

As a point of reference, the green stuff in the lower left part of the slice is some of the dandy greens (mostly leaf stems), and the top and right pieces of green are the sorrel. The texture of both types of greens were pretty good, so in addition to the blanched and tasty frozen dandies, it looks like just sticking the sorrel in the freezer works pretty well.

How do you preserve your dandelion greens?

Read More..

Rabu, 01 Juni 2016

The Deadliest Catch

The Discovery Channel says its program last year, Deadliest Catch, on the king crab fishery in Alaska was the most successful series introduced in ten years. So naturally they want a repeat.

The new series, with the same name, starts on 9 Pm Tuesday March 28. In this new series the film crews accompanies king crab boats fishing in the fishing for the first time under a quota based fishery. The new series drama is more about fishermen, their luck, the skill of finding crab and the industry in general.

I dont comment much on made for tv stuff, but the past series did a tremendous job popularizing crab and fishing in general many people got their first impression of commercial fishing from the show.

Link to the series information
Read More..
Karen Olson, the founder of Family Promise, is the featured speaker at the grand opening of the new home for the organizations Albuquerque affiliate on Sunday, November 1, 2015, at  3:00 p.m. You are invited to come hear her amazing story and to celebrate Family Promise of Albuquerques new space and expansion at 808 Edith Blvd NE (map).  For more information, call 505-268-0331.

Below is a speech that Ms. Olson gave at the  University of Arkansas Clinton School of Service in May of 2011. 

Read More..

The Science and Engineering of Smores

We realize this post is a few days too late for the first major camping weekend of the summer, but the truth is, we needed a tune-up on our smores theory and practice ourselves.  So now, while the extensive refresher training we completed over the last few days is still at the front of our minds, we wanted to put out a short treatise on the intricacies and nuances of marshmallow roasting and smore eating.

The first step in creating a smore is to initiate the thermal oxidation of some woody biomass.  To avoid marshmallow ignition, we want radiant heat from the coals rather than heat from the gas-phase oxidation occurring in flames. That requires full primary combustion of the wood, which takes a considerable amount of time.

The second step is to select a marshmallow roasting device from a nearby tree or shrub, taking care to avoid the species Toxicodendron vernix.  The geometric outlay of the device is to some degree a matter of personal preference, but weve found that a half inch diameter at the base tapering to approximately a quarter inch at the business end, and 2.5-3 feet long, to be optimal for most common campfire heat intensities and standard-size marshmallows.

Similarly, the optimal linearity of the device is a subjective matter.  Some prefer a higher degree of linearity to facilitate a uniform axial rotation during roasting. Others prefer some curviness to allow the roaster to reach preferred roasting locales within the campfire from any position around the fire ring, including those toward which the smoke is not traveling, and independent of other smore engineers who may be occupying prime roasting real estate.

Nearly all experts agree, however, on the advantage of a barbed tip to prevent marshmallow disengagement from the device during the later stages of roasting, when the rigidity of the melty marshmallow core has deceased significantly.  Similarly, there is nearly universal agreement that removal of the bark from the tip of the device prevents inadvertent transfer of bark particles to the marshmallow.

In theory, pure radiative heat from glowing embers produces the most satisfactory roasting experience.  However, in practice, maintaining sufficient heat flow from a bed of embers over the course of tens of minutes that comprise a typical roasting session is challenging (as is having the patience to wait for the wood to finish burning down to coals).  Thus, the optimal sustained roasting environment often requires a combination of actively burning wood and pockets of glowing embers.

With the marshmallow applied to the roasting device, and roasting commenced over an appropriate heat source, the sugars in the outer shell of the marshmallow will begin to caramelize.  The primary chemical challenge during roasting is to uniformly caramelize the entire shell without charring or igniting any part of it.  The preferred technique among experts is a slow, rotisserie-style rotation at 4-6" from the embers, though few possess the patience to functionally sustain such an activity for the duration of the roasting operation. Another challenge is roasting the surface closest to the base end of the roasting device.  There may be some advantage to loading the marshmallow onto the device axially to minimize the surface area facing the base end (since the flat side of the marshmallow is smaller than the curved section), and then lightly smooshing the marshmallow to convert some of the base-facing surface into side-facing surface.

When the marshmallow is satisfactorily caramelized, it can be assembled into a smore, with graham crackers and chocolate as co-ingredients.  In some circles, a preferred embodiment of the smore is one which can be eaten cleanly (i.e., without loss of melted marshmallow to the eaters face or hand, or to the ground).  In such an embodiment, the chocolate and graham must be of the correct pliability, such that biting into the smore results in neither excessive compression of the marshmallow nor shattering of the graham cracker components.  The desired pliability can be achieved by mild heating of the graham and chocolate for 4-5 minutes while roasting the marshmallow (resulting in a final temperature of 100 - 105 °F).  More intensive heating melts the chocolate and toasts the graham, effectively exacerbating the problem.

A proper grip on the smore can also help keep the smore intact while biting.  As this hand model is demonstrating, a firm grip in one quadrant of the graham, using the end section of the first two fingers and the thumb, is optimal for minimizing transfer of marshmallow to the hand while maximizing the exposed area on which to apply the bite.  Large bites, up to the size of the entire smore, also minimize brittle fracture of the graham into the hand.

After roasting one- or two dozen marshmallows, the roasting device can be saved for future use, but a bit of maintenance and cleaning will help preserve its integrity and avoid attracting ants.  A first step in cleaning is commonly to remove as much marshmallow residue as possible by mouth.

Particularly recalcitrant residue can be removed by charring the tip, followed by wiping with an appropriate material, such as a t-shirt or nearby grass.  The health benefits of any residual char that may be transferred to future marshmallows are unclear, but related products are highly valued in some types of cuisine (an explanation of the scientific function of biochar in the digestive tract can be found near minute 19 in the video accompanying the previous link, although the entire episode provides a much more compelling narrative if one is amused by the non-sequitor nature of Japanese cartoons).  The roasting device can be stored somewhere relatively clean and out of the fire pit until needed again.

In conclusion, many factors must be considered to produce an optimally roasted marshmallow and a satisfactorily engineered smore.  We hope this primer has helped elucidate some of those factors, but we welcome additions and suggestions to incorporate into the second edition of this text.

What is your preferred marshmallow-roasting protocol?


Read More..

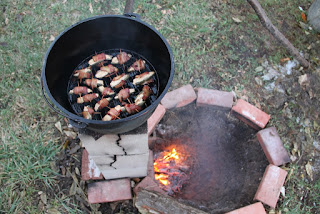
Dakota Rocket Silo version 3 0

We love our Dakota Rocket Silo--it helps us cook outside, put our pruning brush and small-diameter dead trees to good use, render wax, make biochar, and do lots of fun things.  But the original and rebuilt designs had one flaw that cropped up during extended use:


The piece of ground between the holes gets baked pretty good, and eventually weakens and starts crumbling, which makes the chimney part not level.  It might not be as much of a problem with wider cinder blocks where more of the support comes from the sides.

But weve got skinny cinder blocks, so we took out the middle part and built a brick foundation.  Theyre not fire bricks, so they probably wont last too long, but they were free!  This setup lets us keep the in-ground aspect that we like so much, but hopefully will stay level for longer.  Plus, it looks kind of Petra-esque.

We fired it up, and sure enough, it burns like a champ.  Next test: will it stay level through a winter?

JalapeƱo popper, anyone? (They took a LONG time to cook this way, but they were really good!)


Read More..

Arctic Char In Sustainable Farming

picture of high density arctic char farming in tanks
Arctic Char Growing In Tanks
My experiences raising Arctic Char in land based farms using tanks and raceways, with groundwater supplies and water recirculation aquaculture systems, have been positive overall.

I am what you may call a Charr fanatic since the early eighties and most of my experience has been hard won. The road to now has had its share of bumps and even a couple of cliff sized falls. There have fortunately also been some sunny times and even pay days. It has been interesting and rewarding in many ways but also frustrating at times.

I have grown Char at stocking densities that exceed the normal for rainbow trout or salmon in similar farming systems. In a properly designed and operated land based farm, this factor can lead to increased production amounts per unit of rearing space. The high density stocking characteristics of the species can allow the production intensification necessary in controlled systems and provide increased economy of scale, helping to offset the increased costs of building eco-friendly land based fish farms.Full article published at northernaquafarms.com "Arctic Charr Aquaculture - History and Experiences in Canada"

Related Content

Hobby Farming - A Growing Trend
Water Recirculation Aquaculture
Aquaponics - Sustainable Farming


Read More..